Saturday, September 16, 2023

How many plants in a 3×3 grow tent?

Growing plants in a 3×3 grow tent can be an incredibly rewarding experience. Not only do you get to watch your plants flourish, but you also get the added benefit of controlling their environment for optimal growth. But how many plants should you put in your 3×3 grow tent?

The answer isn’t as straightforward as it may seem. The number of plants that will thrive and produce the best harvests depends on several factors, such as plant placement, light intensity and ventilation levels.

In this article we will explore all these elements to help determine the ideal number of plants for a 3×3 grow tent so that you can maximize your yield while getting the most out of your space. We’ll look at optimal plant placement strategies, growing tips and more to ensure success with every harvest!

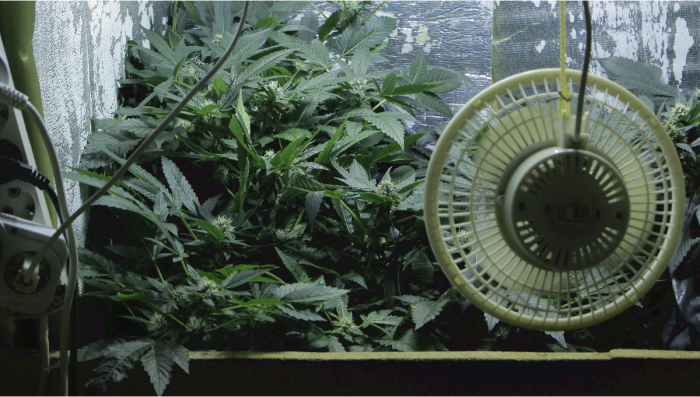
A 3D rendering of an aquarium with plants in a 3x3 grow tent.
A 3D rendering of an aquarium with plants in a 3×3 grow tent.

When it comes to setting up a grow tent, one of the most important decisions to make is how many plants you will be growing. A 3×3 grow tent is an ideal size for those looking to get started with indoor gardening and can accommodate a variety of different plant types.

The number of plants that can fit in a 3×3 grow tent depends on several factors, including the type and size of the plants being grown, as well as the amount of light available. For example, if you are growing smaller varieties such as herbs or lettuce then you could easily fit up to 24 individual pots in your 3×3 space without overcrowding them. On the other hand, larger plants like tomatoes may require more room so fewer would be able to fit into this area comfortably.

In terms of lighting requirements for your setup, LED lights are becoming increasingly popular due their energy efficiency and long lifespan compared with traditional fluorescent bulbs or HID lights (High Intensity Discharge). Depending on what type and strength LED light you choose will determine how many hours per day they need to be switched on for optimal growth conditions; however generally speaking 8-12 hours should suffice depending on your specific needs. When considering lighting options it’s also important not forget about ventilation which helps keep temperatures consistent within your space while also removing any excess moisture from humid air – both essential elements when cultivating healthy crops indoors!

Finally when deciding how many plants should go inside a 3×3 grow tent its worth bearing in mind that overcrowding can lead problems such as increased competition between neighboring roots systems resulting in stunted growth or even disease outbreaks – something no gardener wants! Therefore its best practice where possible leave some extra room around each pot so that there’s plenty airflow circulating throughout all areas ensuring everyone gets enough nutrients from soil/water sources without having compete against each other too much!

Maximize Your Yield: How Many Plants in a 3×3 Grow Tent?

Maximizing your yield is a key goal for any grower, and one of the most important decisions you can make to achieve this is deciding how many plants to put in your 3×3 grow tent. The number of plants you choose will depend on several factors, including the type of strain being grown, available space within the tent, and desired yield.

When it comes to choosing how many plants are best suited for a 3×3 grow tent, there are two main approaches: growing fewer larger plants or more smaller ones. Growing fewer large plants requires less maintenance but may not produce as much overall yield compared with multiple smaller ones. On the other hand, having more small-sized plants allows for greater control over individual plant growth and higher yields overall due to increased light exposure per plant; however this also means that each plant needs more attention from growers in order to ensure optimal results.

Ultimately it’s up to each individual grower’s preference when deciding how many plants should be placed into their 3×3 tents; however some general guidelines can help point them in the right direction depending on their goals and resources available. For example if maximum yields are desired then 4-6 medium sized (2ft) or 8-10 small (1ft) would be ideal whereas if low maintenance is preferred then 2-4 large (4ft+) might be better suited instead. Additionally keep in mind that overcrowding should always be avoided as this could lead to stunted growth or even death among weaker specimens due lack of air circulation within confined spaces like tents!

A 3x3 grow tent with plants on a table in a green house.
A 3×3 grow tent with plants on a table in a green house.

Grow Bigger, Better Harvests: Plant Count for a 3×3 Tent

Growing bigger and better harvests in a 3×3 tent can be achieved by understanding the ideal plant count for your grow space. The number of plants you choose to grow will depend on the size of your tent, as well as the type of crop you are growing. Knowing how many plants to place in a 3×3 tent is essential for achieving maximum yields with minimal effort.

When it comes to selecting the right number of plants, there are several factors that need to be taken into consideration including light intensity, air circulation, and nutrient availability. For example, if you’re using high-intensity lighting such as HID or LED lights then fewer plants may be needed due to higher light intensity levels. On the other hand, if you’re using lower-intensity lighting such as fluorescent bulbs then more plants may be necessary since they require less light per square foot than their counterparts do.

It’s also important to consider air circulation when determining how many plants should go in a 3×3 tent; too few or too many can lead to poor ventilation which can cause issues like mold growth and pest infestations down the line. Generally speaking though, most growers recommend placing two or three medium sized (2–4 feet tall) cannabis strains within a single 3×3 grow space for optimal results – this allows enough room between each plant so that they don’t compete with one another while still providing adequate airflow throughout all areas of your garden setup!

Ultimately though it’s up to each individual gardener what works best for them based on their own unique needs; some people prefer larger numbers while others opt for smaller ones depending on their goals and resources available at any given time – either way having an understanding about how many plants should go into a 3×3 tent is key when trying achieve bigger better harvests!

Optimal Plant Placement in a 3×3 Grow Tent

When it comes to optimal plant placement in a 3×3 grow tent, there are several factors to consider. The size of the plants, the type of lighting used and the amount of airflow all play an important role in determining how many plants can be placed inside.

The first step is to determine what size your plants will be at maturity. This will help you decide how much space each one needs for proper growth and development. If you have smaller plants that require less space, then more can fit into a 3×3 grow tent than if larger ones were chosen instead.

Next, consider what type of lighting system you’ll use for your indoor garden setup as this also affects how many plants can fit inside a 3×3 grow tent comfortably. For example, LED lights provide more intense light coverage compared to fluorescent bulbs which may allow for fewer but larger sized plants within the same area due to their higher light output per square foot ratio.

Finally, make sure that adequate airflow is provided throughout your indoor garden setup as well since this helps keep temperatures regulated and prevents humidity from becoming too high or low which could lead to problems with pests or disease affecting your crop yield negatively over time if not addressed properly early on in its growth cycle stages. With these three key points taken into consideration when planning out optimal plant placement within a 3×3 grow tent environment – size , lighting , & ventilation -you should be able to get an idea about just how many individual specimens would work best given any particular situation!

A green house with plants on a table in front of a 3x3 grow tent.
A green house with plants on a table in front of a 3×3 grow tent.

Getting the Most Out of Your Space: Growing Tips for a 3×3 Tent

Maximizing the space in your 3×3 grow tent is essential for getting the most out of your plants. Here are some tips to help you get started:

  • 1. Choose Your Plants Wisely – When it comes to growing in a 3×3 tent, selecting the right plants is key. Look for varieties that won’t get too big and will fit comfortably within the confines of your tent. This way, you can maximize yield without overcrowding or stressing out your plants.
  • 2. Utilize Vertical Space – Don’t forget about vertical space! If you have tall enough ceilings, consider using trellises or other supports to help train and support taller varieties of plants as they grow upwards towards light sources like LED panels or HPS bulbs suspended from above.
  • 3. Invest in Quality Lighting – Quality lighting is one of the most important investments when it comes to growing indoors – especially if you’re working with limited space like a 3×3 grow tent! Make sure that whatever type of lighting system you choose provides adequate coverage across all areas inside your tent so that each plant gets an equal amount of light energy throughout its growth cycle – this will ensure maximum yields come harvest time!
  • 4. Keep It Clean & Organized– Finally, don’t forget about keeping things clean and organized inside your 3×3 grow tent at all times! This means regularly cleaning up any debris (such as dead leaves) which can accumulate over time; maintaining proper air circulation by opening vents/doors when needed; and ensuring there’s no buildup on walls/ceilings due to humidity levels being too high inside the environment itself (this could lead to mold growth). All these steps will go a long way towards helping keep everything running smoothly during each stage of plant development – from germination through flowering/harvesting stages alike!
A 3x3 grow tent with plants growing in it.
A 3×3 grow tent with plants growing in it.

The Right Number of Plants to Maximize Growth in your 3×3 Grow Tent

When it comes to maximizing growth in your 3×3 grow tent, the right number of plants is key. Too few and you won’t get the most out of your space; too many and you risk overcrowding. So how do you decide on the perfect amount?

The answer depends on a variety of factors, such as strain type, light intensity, ventilation system and nutrient availability. Generally speaking though, if you’re using high-intensity lighting (such as LED or HPS) then one plant per square foot should be enough for optimal growth. For lower intensity lighting (like fluorescent), two plants per square foot may be necessary to achieve maximum yields.

It’s also important to consider airflow when deciding how many plants to use in your 3×3 grow tent – good air circulation is essential for healthy plant development so make sure there’s plenty of room between each individual plant for adequate air flow! Additionally, ensure that all sides are well ventilated with fans or ducts so that temperatures remain consistent throughout the entire environment.

Finally, don’t forget about nutrient availability – depending on what kind of nutrients you’re using (liquid or powder form), it might be necessary to adjust fertilizer levels accordingly if more than one plant is present in a single area/square foot! This will help ensure that each individual receives its fair share without any competition from neighboring plants which could lead to stunted growth due lack resources being spread too thin across multiple individuals at once!

Overall then – when considering how many plants should go into a 3×3 grow tent – take into account factors like strain type & light intensity along with ventilation & nutrient availability before making any decisions regarding numbers! Doing this will help guarantee successful harvests while avoiding overcrowding issues down the line…

  1. What is a Greenhouse? – This article from Penn State University’s website provides information on what a greenhouse is, discussing its structure and the benefits of using one for growing plants. The article was published on April 14, 2015.
  2. How do I start an educational greenhouse at school? – Published on January 2, 2020, by Heidi Lindberg from Michigan State University Extension, this article guides you on how to start an educational greenhouse at a school, discussing the necessary steps and considerations to take into account.
  3. Greenhouse Vegetable Production – This article from New Mexico State University, published on January 1, 2022, focuses on greenhouse vegetable production, offering insights into the best practices for growing vegetables in a greenhouse setting.


from HydroponicHarmony https://hydroponicharmony.com/how-many-plants-in-a-3x3-grow-tent/

How many plants in 4×4 grow tent

Absolutely, understanding the optimal How many plants in 4×4 grow tent is crucial for both novice and veteran growers aiming to maximize efficiency and yield. This guide seeks to shed light on the various elements that influence the number of plants one can accommodate in a 4×4 tent, ensuring that every square inch is utilized optimally without compromising the quality of the yield.

In the subsequent sections, we will delve deeper into the nuances of selecting the right number of plants for your compact growing space. We will explore strategies to enhance growing conditions, thereby ensuring that each corner of your 4×4 grow tent is leveraged to its fullest potential. Moreover, we will share insights on how to strategically arrange more plants in a restricted area without sacrificing their health and yield.

By adhering to the guidelines outlined in this article, you can transform your compact 4×4 grow tent into a powerhouse of productivity, nurturing plants to their fullest potential.

Embarking on the journey of cultivating plants in 4×4 grow tent can be a fulfilling endeavor. This setup offers an ideal habitat for your plants, affording them ample space and light to flourish. However, determining the precise number of plants that can be accommodated in a 4×4 tent necessitates considering various factors.

Generally, a 4×4 grow tent can house between 6-12 medium-sized plants comfortably. However, for growers inclined towards cultivating smaller plants like herbs or lettuce, it is feasible to arrange up to 20 small to medium plants in this space. The decisive factors here include the plant species and their growth patterns at maturity.

To ascertain the optimal number of plants for your 4×4 grow tent, several vital aspects warrant consideration. Firstly, the available light must be gauged to prevent issues such as plant burn due to excessive light or insufficient energy for photosynthesis owing to inadequate light. Secondly, ensuring proper ventilation is pivotal to maintaining the ideal temperature levels in the confined space. Lastly, the soil depth is a critical factor influencing root development and, consequently, nutrient absorption, impacting the overall plant health and yield.

The choice of the number of plants in 4×4 grow tent hinges on individual preferences and the balance between yield quality and quantity, coupled with time management considerations. Through meticulous planning and understanding of the plants’ needs, growers can attain remarkable results, be it with 6, 12, or even 20 plants in their indoor garden.

Maximizing Yield on plants in 4×4 grow tent

A greenhouse with plants growing in it. How many plants in 4x4 grow tent
A greenhouse with plants growing in it. How many plants in 4×4 grow tent

Absolutely, optimizing the yield of plants in 4×4 grow tent is a pivotal consideration for every horticulturist. Employing the correct strategies can significantly enhance the productivity of the confined space, ensuring robust and healthy plant growth. Below, we offer a series of tips designed to help you elevate the yield in a 4×4 grow tent:

  1. Opt for high-yielding plant varieties: The initial step in maximizing your yield is selecting plant varieties known for their high yield. This strategy ensures that each plant nurtured in the restricted space of a 4×4 grow tent contributes maximally to the overall harvest.
  2. Embrace vertical gardening techniques: Incorporating vertical gardening solutions such as trellises or hanging baskets can be a game-changer in enhancing yields. These methods facilitate the cultivation of a larger number of plants without occupying substantial ground space in the 4×4 grow tent.
  3. Enhance light distribution: Ensuring uniform light distribution across all corners of your garden is vital. Utilize reflective materials on the walls and ceiling to channel light to the less illuminated areas or supplement with artificial lighting during periods of insufficient natural light, such as nighttime.

Moreover, investing in LED lights can be a prudent choice, offering intense lighting while being energy-efficient compared to conventional bulbs. This approach not only fosters healthy plant growth but also is economically beneficial in the long run, promoting optimal yields in your 4×4 grow tent.

Lastly, maintaining a conducive temperature within the tent is essential. Excessive heat can be detrimental to the plants, causing damage to the foliage. Therefore, it is advisable to employ cooling systems such as fans or air conditioners, especially during the hot summer months, to sustain the ideal temperature range conducive for plant growth and productivity in the 4×4 grow tent.

By adhering to these guidelines, you can ensure a thriving garden with a remarkable yield, leveraging the full potential of your 4×4 grow tent.

Get the Most Out of Your 4×4 Grow Space

A greenhouse with plants growing in it. How many plants in 4x4 grow tent
A greenhouse with plants growing in it. How many plants in 4×4 grow tent

Absolutely, leveraging the full potential of your plants in 4×4 grow tent is crucial to garnering the most fruitful yields. Through meticulous planning and the right setup, you can optimize the output from this confined space. Here we present a series of tips to assist you in maximizing the productivity of your 4×4 grow tent:

  1. Initiate with a well-articulated plan – Embarking on your gardening journey with a well-thought-out plan is pivotal. Before setting up your tent, have a precise understanding of the number of plants you intend to nurture and their designated positions within the tent. This foresight ensures that each plant enjoys sufficient space to flourish, avoiding overcrowding and competition for essential resources such as light and water in the 4×4 grow tent.
  2. Opt for high-yield strains – When working within the confined space of a 4×4 grow tent, choosing strains renowned for higher yields per square foot becomes vital. Seek out varieties characterized by dense buds and abundant harvests to fully utilize every square inch of the available growing space within the boundaries of the tent.
  3. Implement vertical growing strategies – Employing vertical growing techniques such as trellising or training can significantly enhance the yield. These strategies allow for the accommodation of a larger number of plants in a restricted area, ensuring they receive ample light, especially from overhead LED lights. Moreover, these techniques facilitate improved air circulation, helping to maintain lower humidity levels within the 4×4 grow tent, a crucial aspect in preventing mold formation.

By adhering to these guidelines, you can ensure a thriving and productive environment for your plants in 4×4 grow tent, paving the way for a bountiful harvest.

Plant Selection for Maximum Efficiency in a 4×4 Tent

A greenhouse with plants on it.
A greenhouse with plants on it. How many plants in 4×4 grow tent


When it comes to cultivating plants in 4×4 grow tent, careful consideration of the space’s dimensions and the number of plants that can be accommodated comfortably is imperative. The capacity of a 4×4 grow tent to house plants hinges on various factors including the species of the plant, its growth trajectory, and its lighting necessities.

To attain the pinnacle of efficiency, it is recommended to opt for plant varieties that exhibit a compact growth pattern and necessitate minimal intervention in terms of pruning or training. This strategy not only ensures optimal utilization of the available space but also facilitates easier maintenance of the plants in 4×4 grow tent.

Furthermore, harmonizing the light requirements of different plants is a strategic move. By choosing plants with similar light preferences, you foster a nurturing environment where every plant receives the requisite amount of light without encroaching upon others, thereby promoting healthy growth in the confined space of a 4×4 grow tent.

Lastly, giving preference to disease-resistant strains can be a game-changer. It not only minimizes the potential for encountering issues in the later stages of growth but also guarantees a robust growth cycle, ensuring that your 4×4 grow tent remains a hub of vibrant and healthy plants throughout the cultivation period.

By adhering to these guidelines, you pave the way for a thriving ecosystem within your 4×4 grow tent, optimizing efficiency and promising a fruitful harvest.

How to Fit More Plants into Your Smaller Grow Space

A greenhouse with plants in it.
A greenhouse with plants in it. How many plants in 4×4 grow tent

If you are venturing into maximizing the potential of plants in 4×4 grow tent, there are several ingenious strategies at your disposal to accommodate more plants in a confined grow space. The initial step in this endeavor is to meticulously assess the dimensions of your tent or the designated growing area. In the context of a 4×4 grow tent, it becomes pivotal to devise a well-thought-out plan delineating the number of plants that can be housed comfortably within the stipulated space.

A cardinal rule to augment the capacity of your 4×4 grow tent is to leverage the vertical dimension to its fullest potential. This entails the incorporation of structures such as trellises and stakes to facilitate the upward growth of vines, thereby preventing them from occupying the precious horizontal space. Moreover, adopting training methodologies such as topping and pruning can be instrumental in regulating plant growth, ensuring they have ample space for underground root development while maintaining a controlled growth pattern above the soil.

Investing in multi-pocket containers emerges as another viable strategy, where each pocket accommodates sufficient soil volume to nurture individual plant roots without causing congestion with neighboring root systems. This approach not only optimizes space but also fosters a healthy growth environment for the plants in 4×4 grow tent.

Furthermore, it is prudent to group plants with similar growth requirements together, as they would have comparable needs in terms of environmental conditions, such as lighting. This tactic simplifies the management of various plant needs, allowing for a more streamlined cultivation process in your 4×4 grow tent.

Lastly, one cannot overlook the significance of proper air circulation in ensuring the healthy growth of plants in 4×4 grow tent. Ensuring the presence of adequate ventilation points facilitates the circulation of fresh air, enveloping all plants evenly and fostering a conducive growth environment.

Armed with these insights, you are now equipped to creatively and efficiently utilize the space in your 4×4 grow tent, catering to both your needs and the requirements of the plants, promising a lush and bountiful harvest.

Optimize Growing Conditions with the Right Plants for your 4×4 Tent

A 3d rendering of an aquarium with plants in it.
A 3d rendering of an aquarium with plants in it. How many plants in 4×4 grow tent

Optimizing the environment for plants in 4×4 grow tent is a pivotal step in ensuring a successful harvest. Selecting the right plants that are compatible with the specific conditions of a 4×4 grow tent can significantly enhance the outcome. It is imperative to meticulously consider aspects such as the lighting prerequisites, the optimal temperature and humidity ranges, and the water requirements of different plants to tailor the perfect setup for your grow tent.

In your quest to choose the ideal plants for a 4×4 grow tent, prioritize varieties that are low-maintenance and do not demand a large growing space or intensive care. A range of herbs such as basil and parsley, leafy greens including kale and spinach, along with vegetables like tomatoes, peppers, cucumbers, squash, and eggplants, are excellent choices. These crops are particularly well-suited for 4×4 grow tents as they flourish without needing excessive light or water, thereby facilitating easier management in a confined space.

For those aiming to reap substantial yields from their 4×4 grow tent, venturing into larger-scale crops such as high-yielding cannabis strains, including the renowned White Widow, could be a rewarding choice. It is essential to ensure proper ventilation in the grow tent to thwart mold growth, a common issue stemming from high moisture levels. Adequate ventilation also aids in maintaining a stable temperature throughout the day and night, a critical factor in maximizing the yield potential of any crop.

Lastly, to foster a thriving environment for plants in 4×4 grow tent, you might consider supplementing the natural light with additional lighting systems. LED lights stand out as a superior choice, offering bright illumination without emanating excessive heat, which could be detrimental, especially in the hot summer months. Moreover, LED lights enhance the growth environment by emitting additional UV rays, promoting photosynthesis and steering the plants towards healthier growth trajectories over time. By adhering to these guidelines, you can set the stage for a vibrant and prolific 4×4 grow tent garden.

  1. Greenhouse Management – This resource from the University of Maryland Extension offers a range of articles and publications on various aspects of greenhouse management, including pest control, plant health, and environmental control systems.
  2. Greenhouses – On this page from the United States Department of Agriculture (USDA), you can find information on the role of greenhouses in pest control and the regulations that govern greenhouse operations in the U.S.
  3. Greenhouse Vegetable Production – This publication from the University of Georgia Extension provides detailed guidance on greenhouse vegetable production, including information on greenhouse structures, environmental control, and crop production practices.


from HydroponicHarmony https://hydroponicharmony.com/how-man-plants-in-4x4-grow-tent/

Friday, September 15, 2023

Is it cheaper to build your own grow tent?

Indoor gardening is becoming increasingly popular, and for good reason. With the right setup, you can grow your own plants all year round in a controlled environment. One of the most important components of an indoor garden is a grow tent – but do you really need to buy one?

Building your own customised grow tent could be a great way to save money while still creating the perfect space for growing plants indoors. In this article, we’ll explore why constructing your own DIY grow tent might be beneficial and how it can help you create an expert-level indoor garden setup without breaking the bank.

We’ll look at some of the advantages that come with building your own grow tent as well as what materials are needed and how much time it will take. Finally, we’ll discuss ways to make sure that when designing and constructing your customised indoor garden space everything runs smoothly so that you get maximum results from minimal effort!

Building your own grow tent is a great way to save money and get the exact size you need for your indoor gardening project. It may seem daunting at first, but with the right materials and instructions, anyone can build their own grow tent.

The most important factor when building a grow tent is choosing the right material. The best choice for this type of project is heavy-duty canvas fabric that has been treated to be waterproof and fire retardant. This will ensure that it will last through many growing cycles without needing replacement parts or repairs. Additionally, make sure to buy enough fabric so that there are no gaps between pieces when assembling the frame of the tent – this helps keep out pests and other unwanted visitors from entering your garden space!

Once you have chosen an appropriate material for your build, it’s time to assemble all of the necessary components such as poles, connectors, clips etc., in order to create a sturdy frame for your new home-made structure. Make sure everything fits together properly before attaching any additional pieces like zippers or Velcro strips which help secure doors or windows shut while keeping light from escaping outside of its intended area within the room/space where plants are being grown indoors.

When constructing any type of structure like this one – especially if using metal components – always remember safety first! Wear protective gloves while handling sharp edges on frames/poles; use caution when tightening screws into place (over-tightening could cause damage); double check measurements before cutting anything; make sure all connections are securely fastened together; never leave exposed wires lying around near water sources etc.. These simple steps can go a long way towards preventing accidents during construction as well as ensuring longevity in terms of how long your homemade grow tent lasts over time!

Finally – once everything has been put together – take some extra precautions by adding reflective Mylar lining inside walls & ceilings which helps reflect light back onto plants more efficiently than regular white paint would do alone (this also reduces heat buildup). Additionally consider investing in some kind of ventilation system such as fans/filters which help keep air circulating throughout enclosed spaces thus providing better conditions overall for plant growth & health maintenance purposes too!

Discover the Benefits of Building Your Own Grow Tent

Discover the Benefits of Building Your Own Grow Tent

Building your own grow tent can be a great way to save money and get the exact size and features you need for your indoor garden. Not only is it cost-effective, but it also allows you to customize the environment of your plants. With a few simple materials, you can create an ideal space for growing vegetables, herbs, flowers or other plants indoors.

The benefits of building your own grow tent are numerous: firstly, they are much more affordable than pre-made tents on the market; secondly, they allow for greater customization in terms of size and features; thirdly, they provide better insulation from outside temperatures; fourthly, their construction is relatively straightforward – all that’s needed is some basic tools like screws and drill bits as well as fabric such as canvas or polyester tarpaulin; finally – most importantly – with careful planning and design considerations taken into account during construction (such as ventilation), these DIY projects can result in an optimal environment for plant growth.

In conclusion: if you’re looking to save money while creating a custom indoor gardening space tailored specifically to meet the needs of your plants then building your own grow tent could be just what you need!

Cost-Effective Growing: Build Your Own Grow Tent

Cost-Effective Growing: Build Your Own Grow Tent

Grow tents are an increasingly popular way to cultivate plants indoors, providing a controlled environment for optimal growth. But is it more cost-effective to build your own grow tent?

The answer depends on the size of the tent you need and what materials you have available. Building your own grow tent can be cheaper than buying one off the shelf, but only if you have access to all necessary components. For example, if you already have a frame or poles that can support the weight of fabric walls then this will reduce costs significantly. You’ll also need reflective material such as Mylar film and blackout cloth for light control – these items may not be readily available in your local hardware store so factor in additional costs when budgeting for supplies.

If building from scratch isn’t feasible due to time constraints or lack of resources then there are other options such as purchasing pre-made kits which include everything needed including frames and reflective material – these tend to be more expensive but they save time by eliminating any guesswork involved with sourcing individual parts yourself.

Ultimately, whether it’s cheaper to build your own grow tent comes down to personal preference and availability of resources; however, with careful planning it is possible create an effective growing space without breaking the bank!

The Advantages of DIY: Constructing a Grow Tent

The Advantages of DIY: Constructing a Grow Tent

DIY projects can be a great way to save money while still getting the job done. Constructing your own grow tent is no exception. Not only does it allow you to customize the size and features of your tent, but it also allows you to save on costs associated with purchasing one from a store or online retailer.

The advantages of building your own grow tent are numerous. First, you have complete control over the design and construction process, allowing for maximum customization according to individual needs and preferences. This means that if you need extra ventilation ports or additional shelving space, these can easily be added during construction without having to purchase an entirely new unit from a store or online retailer. Additionally, constructing your own grow tent allows for greater flexibility in terms of budget; as materials are purchased separately rather than all at once in one package deal, this makes it easier for those on tighter budgets who may not otherwise be able to afford pre-made tents available through stores or retailers.

Another advantage of DIY-ing when constructing a grow tent is that many parts used in its assembly can often be found around the house – such as PVC pipes – which further reduces cost by eliminating any need for purchasing additional materials specifically designed for use with pre-made tents available through stores and retailers (which tend to come at higher prices). Furthermore, because there is no need for professional installation services when building one’s own unit (as would likely be necessary if buying pre-made), this also helps reduce overall cost significantly compared with other options available on the market today!

Save Money and Time with a Customised Grow Tent Setup

Save Money and Time with a Customised Grow Tent Setup

Are you looking for a cost-effective way to grow your own plants? A customised grow tent setup may be the answer. Not only can it save you money, but it also saves time and effort in setting up and maintaining your growing environment.

A customised grow tent setup is designed to fit your specific needs and requirements, allowing you to create an optimal environment for plant growth. This includes factors such as light intensity, temperature control, air circulation, humidity levels and nutrient availability – all of which are essential for healthy plant growth. With a tailored setup like this in place, there’s no need to purchase additional equipment or materials that may not be necessary or suitable for the task at hand.

As well as saving money on unnecessary purchases, having a customised grow tent also helps reduce set-up time significantly compared with traditional methods of gardening indoors or outdoors. All components are pre-assembled according to your specifications so that they work together seamlessly – meaning less hassle when getting started with planting! Plus if any adjustments need making down the line (such as adding extra lighting), these can easily be done without needing extensive reworking of existing structures within the space itself – again saving both time and energy on maintenance tasks too!

Overall then investing in a customised grow tent is an excellent option if you want to save both money AND time while creating an ideal growing environment from scratch!

Grow Like an Expert – Design Your Own Indoor Garden Space.

Grow Like an Expert - Design Your Own Indoor Garden Space.

Indoor gardening is becoming increasingly popular as more and more people are recognizing the benefits of growing their own food. Whether you’re looking to save money on produce or just want to enjoy the satisfaction of tending your own garden, creating an indoor grow space can be a great way to get started. With a few simple steps, you can design your own indoor garden space that will help you grow like an expert!

First, decide what type of plants you’d like to cultivate in your new space. Consider factors such as light requirements and climate needs when selecting plants for your grow area. Once you’ve chosen which species will work best for your environment, it’s time to start planning out how much room they’ll need and where they should go in relation to each other. This step is important because overcrowding can lead to poor growth or even death of some plants due its competition with others for resources such as light and water.

Next up is choosing the right materials for constructing your indoor garden setup – this could include everything from shelves or stands that hold pots off the ground, lighting fixtures if needed (depending on plant selection), fans/ventilation systems if necessary (again depending on plant selection) etc.. Be sure not only pick items that fit within budget but also ones that are durable enough so they won’t need replacing anytime soon! It’s also important consider any safety concerns when building out this type of project – make sure all wiring/electrical components are properly insulated against moisture damage and take extra precautions with ventilation systems since these often involve combustible gases which require special handling procedures during installation & maintenance processes.
Once all materials have been selected & purchased then comes assembly time – use caution here too; read instructions carefully before beginning construction process so there aren’t any surprises down the line! Finally once everything has been put together correctly it’s time add soil & seeds/plants into place – now watch those little sprouts begin their journey towards becoming big beautiful vegetables ready harvest later down road… Enjoy!


from HydroponicHarmony https://hydroponicharmony.com/is-it-cheaper-to-build-your-own-grow-tent/

Tuesday, September 12, 2023

Is indoor grow tent better than greenhouse?

Indoor growing is becoming increasingly popular as more and more people look for ways to cultivate their own plants. But with so many options, it can be difficult to decide which one is best for you. Should you opt for a greenhouse or an indoor grow tent? In this article, we will explore the benefits of both and compare them in terms of yields, cost-effectiveness, convenience and other factors.

We will start by looking at the advantages that come with using an indoor grow tent compared to a traditional greenhouse. We’ll then discuss how maximizing yields can be achieved through careful planning when setting up your indoor environment. Finally we’ll weigh up the pros and cons of each option before giving our verdict on which one might suit your needs best.

So if you’re considering taking on an indoor gardening project but aren’t sure where to begin – read on!

Indoor grow tents and greenhouses are both popular options for those looking to cultivate plants indoors. Both provide an enclosed space with controlled environmental conditions, allowing gardeners to create the ideal environment for their plants. However, there are some key differences between these two growing methods that can help you decide which is best suited for your needs.

When it comes to cost and convenience, indoor grow tents have a clear advantage over greenhouses. Indoor grow tents come in all shapes and sizes so they can fit into any available space in your home or garage without taking up too much room or costing too much money. They also require minimal setup time compared to building a greenhouse from scratch, making them an ideal choice if you want something quick and easy that won’t break the bank.

In terms of temperature control, indoor grow tents offer more flexibility than greenhouses due to their ability to be moved around easily when needed as well as having adjustable vents on the sides of the tent itself which allow air flow regulation depending on what type of plant is being grown inside it at any given time. This makes them perfect for those who need specific temperatures maintained throughout different stages of growth or during certain times of day/night cycles when temperatures may fluctuate outside naturally. Additionally , since most indoor grow tents are made out of reflective materials , they also help keep light levels consistent within its walls while still allowing natural sunlight through windows if desired.

On the other hand , greenhouses typically provide more stability in terms of temperature control due to their permanent structure but this does come at a higher cost upfront since constructing one requires more effort than setting up an indoor tent. Greenhouse designs also tend not be very flexible when it comes adjusting size or shape once built so if you’re looking for something with more versatility then an indoor tent might be better suited instead. Furthermore , because they rely heavily on natural sunlight coming through windows rather than artificial lighting sources like LED lights found inside many modern-day hydroponic systems (which can often produce higher yields) then overall yield potentials may not reach maximum levels unless supplemental lighting sources such as HID lamps are used alongside traditional window-based setups – thus adding additional costs onto already expensive projects.

Overall while both methods have advantages and disadvantages depending on individual needs , ultimately choosing between either option will depend largely upon budget constraints along with how much energy one has available (both physical & financial) towards creating either system from scratch – though whichever method chosen should still yield satisfactory results regardless!

Discover the Benefits of Indoor Grow Tents

Discover the Benefits of Indoor Grow Tents

Indoor grow tents offer a variety of benefits for those looking to cultivate plants indoors. For starters, they provide an enclosed environment that can be easily controlled and monitored. This means you can adjust the temperature, humidity, light levels and other environmental factors to create the perfect conditions for your plants to thrive. Additionally, indoor grow tents are much more affordable than greenhouses and require less maintenance as well.

Indoor grow tents also come in a range of sizes so you can find one that fits your space perfectly without having to make any major modifications or renovations. Furthermore, because they’re self-contained units with their own ventilation systems built in, there’s no need to worry about external elements such as pests or weather affecting your crop yield either!

Finally, indoor grow tents are incredibly easy to set up and use – all you need is some basic knowledge on how best to care for your plants within them! With just a few simple steps you could have everything ready in no time at all – making it ideal if you’re short on time but still want great results from growing indoors!

Comparing Greenhouse and Grow Tent Cultivation

Comparing Greenhouse and Grow Tent Cultivation

When it comes to cultivating plants indoors, there are two main options: greenhouses and grow tents. Both offer advantages and disadvantages depending on the needs of the grower.

Greenhouses provide a more natural environment for growing plants as they allow in sunlight from outside while still providing protection from wind, rain, pests, and other environmental factors. Greenhouse cultivation is ideal for those looking to create a large-scale operation or who have limited space outdoors but need plenty of light for their crops. The downside is that greenhouses require more energy to maintain due to heating/cooling systems needed year-round as well as additional ventilation equipment such as fans or exhaust systems which can be costly over time.

Grow tents offer an alternative solution with many benefits including portability (they can be moved around easily), affordability (they are much cheaper than building a greenhouse) and ease of use (no extra ventilation equipment required). Grow tents also provide complete control over temperature, humidity levels and lighting conditions making them great for beginners just starting out in indoor gardening or experienced growers wanting precise control over their crop’s environment without having to invest in expensive equipment like air conditioners or dehumidifiers.

Maximizing Yields with an Indoor Growing Environment

Maximizing Yields with an Indoor Growing Environment

Indoor growing environments offer a unique opportunity to maximize yields and control the environment in which your plants grow. By controlling temperature, humidity, light intensity, and other factors you can create an ideal environment for your plants to thrive. With an indoor grow tent or greenhouse you can also easily monitor conditions such as pH levels and nutrient availability. This makes it easier to adjust the environment as needed for optimal growth of your crops. Additionally, since these structures are enclosed they provide protection from pests that may otherwise damage or destroy crops grown outdoors.

The biggest advantage of using an indoor growing structure is that it allows you to extend the growing season by providing a controlled climate all year round regardless of outside weather conditions. You can also take advantage of natural sunlight when available while still having access to supplemental lighting when necessary during periods with less daylight hours or inclement weather conditions like rain or snowfall. With this kind of flexibility comes greater potential for higher yields than what could be achieved with outdoor cultivation alone due to increased control over environmental factors such as temperature and humidity levels within the enclosure itself rather than relying on external sources which may not always be reliable depending on location and time of year.

Overall, utilizing an indoor grow tent or greenhouse provides many benefits including extended seasons , better pest prevention , improved crop quality , increased yield potentials , more efficient use of resources (water/fertilizer) ,and greater control over environmental factors leading towards healthier plant growth overall.

The Pros and Cons of Growing in a Tent vs a Greenhouse

The Pros and Cons of Growing in a Tent vs a Greenhouse

Growing plants indoors can be a great way to ensure that your plants get the best environment possible. But when it comes to deciding between a grow tent and a greenhouse, there are pros and cons for each option.

Grow tents offer an enclosed space with adjustable light, temperature, humidity levels, and ventilation. This makes them ideal for indoor growing as they provide complete control over the environment in which your plants will thrive. They also tend to be more affordable than greenhouses and require less maintenance since they’re smaller in size. On the downside, grow tents don’t have natural sunlight or fresh air like greenhouses do so you may need additional lighting sources such as LED lights or HID lamps if you want your plants to reach their full potential growth-wise.

Greenhouses on the other hand offer plenty of natural sunlight which is essential for photosynthesis but this means that temperatures can become too hot during summer months without proper cooling systems installed inside them – something not all growers have access too or budget for! Additionally, greenhouses take up much more space than grow tents so if you’re limited on room then this might not be an ideal option either unless you opt for one of those mini-greenhouse kits available online nowadays! Lastly, due to their larger size they require regular cleaning and maintenance compared with smaller indoor spaces such as grow tents – something else worth considering before making a decision about what type of setup would work best in your situation!

Optimizing Your Plant Growth with an Indoor Grow Tent Setup

Optimizing Your Plant Growth with an Indoor Grow Tent Setup

Indoor grow tents are becoming increasingly popular for those looking to optimize their plant growth. Grow tents provide an enclosed environment that can be easily controlled, allowing you to create the perfect conditions for your plants. With a well-designed indoor grow tent setup, you can ensure optimal temperature and humidity levels as well as adequate light exposure. Additionally, with the right ventilation system in place, you will be able to maintain proper air circulation and keep pests away from your plants. All of these factors contribute to healthy growth and better yields when it comes time for harvest! If you’re looking for a way to maximize your plant production without having to invest in a greenhouse or other expensive equipment, then an indoor grow tent is definitely worth considering!


from HydroponicHarmony https://hydroponicharmony.com/is-indoor-grow-tent-better-than-greenhouse/

Monday, September 11, 2023

What size ventilation fan do I need for a grow tent?

Introduction What size ventilation fan do I need for a grow tent?

When it comes to growing plants in a confined space like a grow tent, proper ventilation is crucial for maintaining optimal conditions. One key component of an effective ventilation system is a ventilation fan. But how do you determine the right size of fan for your grow tent? Here are some factors to consider.

Factors to consider when choosing a ventilation fan

  1. Tent size: The size of your grow tent will greatly influence the size of the ventilation fan you need. A larger tent will require a more powerful fan to ensure proper air circulation. Measure the dimensions of your tent (length, width, and height) to determine the appropriate fan size.
  2. Heat load: The heat generated by your grow lights and other equipment can impact the ventilation requirements. More powerful lights and higher wattages will produce more heat and require a fan with greater airflow capacity to prevent overheating.
  3. Plant count and size: The number and size of your plants will affect the amount of air exchange needed. More plants will require increased airflow to ensure healthy growth and prevent humidity and odor buildup.
  4. Air exchange rate: Consider the desired air exchange rate for your particular plants. Some plants may require more frequent air changes to thrive, while others may be more tolerant of stagnant air.
  5. Noise level: If noise is a concern, choose a fan with a lower decibel rating. Look for fans specifically designed for quiet operation.

It’s important to carefully evaluate these factors to ensure that the ventilation fan you choose adequately meets the needs of your grow tent. Investing in the right size fan will help maintain proper air circulation, control temperature and humidity levels, and promote healthy plant growth.

What size ventilation fan do I need for a grow tent?
Source: homegrowncannabisco.com What size ventilation fan do I need for a grow tent?

Understanding Grow Tent Ventilation

The role of ventilation in maintaining optimal environmental conditions

When it comes to indoor gardening in a grow tent, ventilation plays a crucial role in maintaining the optimal environmental conditions for your plants. Proper ventilation helps to regulate temperature, humidity, and air circulation, which are vital factors for plant growth and health.

How ventilation helps control temperature, humidity, and air circulation

Temperature control: A well-ventilated grow tent helps to dissipate heat and prevent it from building up excessively. Plants require specific temperature ranges for optimal growth, and proper ventilation ensures that the temperature stays within those ranges.

Humidity regulation: Excess moisture can lead to the growth of mold and mildew, which can be detrimental to your plants. Good ventilation helps to control humidity levels by removing excess moisture and bringing in fresh air to maintain the ideal humidity range.

Air circulation: Adequate air circulation is essential for plant health as it promotes the exchange of carbon dioxide and oxygen, which are crucial for photosynthesis. Ventilation ensures that fresh air is continuously supplied, allowing plants to thrive and preventing the buildup of stale air.

Determining the right size ventilation fan for your grow tent depends on several factors, including the size of the tent, the number of plants, and the lighting and equipment used. It is recommended to choose a fan that has enough power to exchange the air volume of your grow tent once every 1-3 minutes.

By investing in the right size ventilation fan and ensuring proper air exchange, you can create an optimal growing environment for your plants and maximize their potential yield.

What size ventilation fan do I need for a grow tent?
Source: 2fast4buds.com

Calculating the Size of Ventilation Fan

Determining the volume of air in the grow tent

When choosing a ventilation fan for your grow tent, it is essential to calculate the volume of air in the tent. This will help you determine the appropriate size of fan needed for optimal air exchange.

Calculating the volume of the grow tent

To calculate the volume of the grow tent, you need to measure its length, width, and height. Multiply these measurements together to get the total volume in cubic feet. For example, if your tent measures 4 feet in length, 2 feet in width, and 6 feet in height, the total volume would be 48 cubic feet.

Determining the necessary air exchange rate

The air exchange rate refers to the number of times the air in the grow tent needs to be replaced per hour. This rate varies depending on the stage of plant growth, the number of plants, and the ambient temperature. As a general guideline, it is recommended to have an air exchange rate of 4-8 times per hour for optimal plant growth.

Choosing the right size ventilation fan based on the tent volume and air exchange rate

Once you have calculated the volume of the grow tent and determined the necessary air exchange rate, you can select a ventilation fan that matches these requirements. It is recommended to choose a fan that can provide the required air exchange rate for the volume of your tent.

Factors to consider when selecting a ventilation fan for a grow tent

In addition to tent volume and air exchange rate, there are other factors to consider when selecting a ventilation fan. These include noise level, power consumption, and additional features like adjustable speed or built-in filters.

Calculating the required air exchange rate for optimal plant growth

To calculate the required air exchange rate, divide the total volume of the grow tent by the desired number of air exchanges per hour. Using the example above with a tent volume of 48 cubic feet and a desired air exchange rate of 4 times per hour, the required air exchange rate would be 12 cubic feet per minute.

Remember, proper ventilation is crucial for maintaining the ideal environment in your grow tent and ensuring healthy plant growth. By accurately calculating the size of the ventilation fan, you can create the optimal airflow needed for successful cultivation.

What size ventilation fan do I need for a grow tent?
Source: m.media-amazon.com What size ventilation fan do I need for a grow tent?

Choosing the Right Ventilation Fan

Different types of ventilation fans available

When it comes to choosing a ventilation fan for your grow tent, there are several types to consider. The most common options include inline fans, centrifugal fans, and mixed flow fans. Each type has its own advantages and specific applications, so it’s important to research and choose the one that best fits your needs.

Calculating the size of the grow tent

The size of your grow tent will dictate the size and power of the ventilation fan you need. Measure the cubic feet of your grow tent by multiplying the length, width, and height. This will give you the volume of the tent, which is necessary for determining the appropriate CFM (cubic feet per minute) rating for your ventilation fan.

Understanding the ventilation requirements for different phases of plant growth

Plants have different ventilation needs at different stages of growth. During the vegetative stage, plants require less airflow compared to the flowering stage when they produce more heat and require increased air movement. Consider the growth cycle of your plants to determine the optimal ventilation requirements.

Choosing the right CFM rating for the ventilation fan

The CFM rating of a ventilation fan determines the amount of air it can move per minute. To calculate the required CFM for your grow tent, aim for at least 1 CFM per square foot of grow space. However, factors such as temperature and humidity may require higher CFM ratings for proper ventilation.

Considering additional features such as noise level and energy efficiency

While CFM rating is important, it’s also essential to consider other factors such as noise level and energy efficiency. Look for fans with adjustable speed settings to customize airflow, and choose models with lower noise levels if you’re concerned about noise pollution. Additionally, opt for energy-efficient fans to minimize power consumption.

Factors to consider when selecting a fan, including noise level and energy efficiency

When selecting a ventilation fan for your grow tent, it’s crucial to consider factors beyond CFM rating. Noise level, energy efficiency, durability, and ease of installation are all important considerations. Read reviews, compare features, and choose a fan that best meets your specific needs and requirements.

What size ventilation fan do I need for a grow tent?
Source: 2fast4buds.com What size ventilation fan do I need for a grow tent?

Installation and Placement of Ventilation Fan

As a grower, one of the critical factors to consider when setting up a grow tent is the ventilation system. Adequate airflow is crucial for maintaining optimal growing conditions and preventing issues like mold and excessive heat. A ventilation fan plays a vital role in ensuring proper air circulation within the grow tent. But how do you determine the right size of a ventilation fan for your specific setup?

Proper positioning of the fan for maximum air circulation

When installing a ventilation fan in your grow tent, it’s important to position it correctly to ensure maximum air circulation. Here are some tips to help you with proper fan placement:

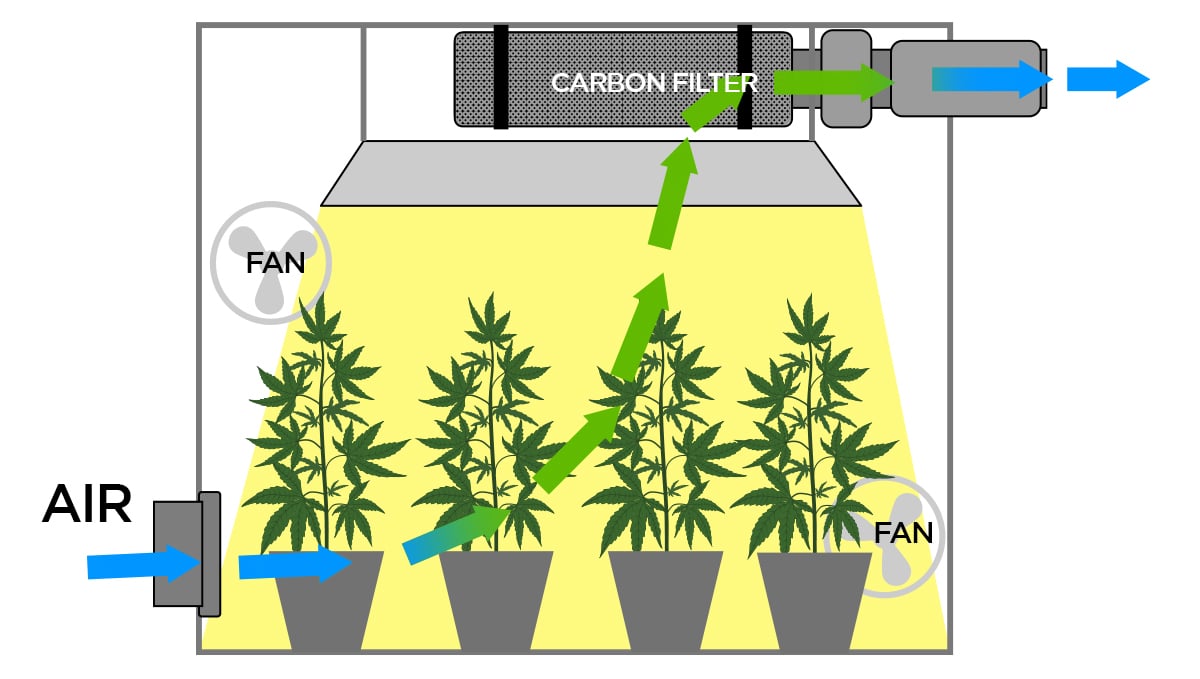
  1. Exhaust fan placement: Place the exhaust fan near the top of the grow tent to effectively remove hot air and odors. This helps create a constant flow of fresh air, ensuring an ideal environment for plant growth.
  2. Intake fan placement: Position the intake fan at the bottom of the grow tent to draw in fresh air from the surrounding environment. This allows for better air exchange and helps regulate temperature and humidity levels.

Tips for reducing noise and maximizing airflow efficiency

To reduce noise and maximize the efficiency of your ventilation fan, consider the following tips:

  1. Fan size: Choose a fan size that matches the size of your grow tent. A fan that is too small may not provide sufficient airflow, while a fan that is too large may create excessive noise.
  2. Ducting: Use ducting to direct the airflow and minimize noise. Ensure that the ducting is properly sealed to prevent air leaks, as this can affect the overall efficiency of the ventilation system.
  3. Fan speed: Adjust the fan speed based on the specific needs of your plants. Higher fan speeds can help control temperature and humidity levels, but they may also increase noise levels.

By considering the proper positioning and size of your ventilation fan, as well as implementing strategies to reduce noise and maximize airflow efficiency, you can create an optimal environment for your plants to thrive in your grow tent.

What size ventilation fan do I need for a grow tent?
Source: 2fast4buds.com What size ventilation fan do I need for a grow tent?

Maintenance and Troubleshooting

As an experienced grower, I understand the importance of maintaining and troubleshooting ventilation fans in your grow tent. Proper maintenance ensures that the fan operates efficiently and effectively, providing optimal airflow for your plants. Here are some regular maintenance practices and common troubleshooting tips to keep your ventilation fan in good condition.

Regular maintenance practices for keeping the fan in good condition

  1. Clean the fan blades: Dust and debris can accumulate on the fan blades over time, reducing the fan’s performance. Regularly clean the blades using a soft brush or cloth to ensure proper airflow.
  2. Check the fan motor: Inspect the fan motor for any signs of wear or damage. Lubricate the motor if necessary, following the manufacturer’s instructions.
  3. Inspect the fan housing: Ensure that the fan housing is free from obstructions and clean. Remove any dirt or debris that may restrict airflow.
  4. Replace worn-out parts: If you notice any damaged or worn-out parts, such as belts or bearings, replace them promptly to avoid further issues.

Common issues with ventilation fans and how to troubleshoot them

  1. Loud noises: If your ventilation fan is producing excessive noise, check for loose or damaged parts. Tighten any loose screws or bolts and replace any damaged components.
  2. Insufficient airflow: If you notice a decrease in airflow, check for obstructions in the air ducts or filters. Clear any blockages and clean or replace the filters to restore proper airflow.
  3. Overheating: If your fan motor is overheating, ensure that it is adequately ventilated and not obstructed by debris. If the issue persists, consult a professional for further advice.

By following these maintenance practices and troubleshooting tips, you can ensure that your ventilation fan operates smoothly and effectively, creating an ideal environment for your plants to grow.

What size ventilation fan do I need for a grow tent?
Source: terra-bloom.com What size ventilation fan do I need for a grow tent?

Conclusion

Summarizing the importance of choosing the right size ventilation fan

When it comes to setting up a grow tent, choosing the right size ventilation fan is crucial for maintaining a healthy growing environment for your plants. The size of the fan directly affects the airflow and temperature regulation in the grow tent.

To determine the size of the ventilation fan you need, consider the size of your grow tent, the number of plants you are growing, and the environmental factors such as heat and humidity. A fan that is too small may not provide sufficient airflow, resulting in stagnant air and increased risk of pests and diseases. On the other hand, a fan that is too large may lead to excessive air movement and temperature fluctuations, which can stress the plants.

Proper ventilation is essential for maintaining the optimal temperature, humidity, and air circulation in a grow tent. It helps to prevent the buildup of heat, humidity, and stale air, ensuring that your plants receive fresh oxygen and carbon dioxide for healthy growth.

Investing in the right size ventilation fan will help create the ideal growing conditions for your plants, promote even distribution of temperature and humidity, and reduce the risk of mold, mildew, and other plant issues.

Remember to consider the specific requirements of your plants and seek guidance from experienced growers or consult the manufacturer’s recommendations when choosing the right size ventilation fan for your grow tent. By ensuring proper ventilation, you can maximize the growth and yield of your plants, ultimately leading to a successful and bountiful harvest.

  1. Greenhouse Manual
    • Domain: usbg.gov (.gov)
    • Published Date: January 1, 2023
    • Description: This manual, hosted on the United States Botanic Garden website, offers a comprehensive guide to greenhouse management, which can be applied to grow tents as well. It provides detailed information on various aspects of managing a controlled environment for plant growth, including tips on ventilation, pest management, and more.
  2. High Tunnels and Season Extension
    • Domain: extension.umd.edu (.edu)
    • Published Date: March 30, 2021
    • Description: This resource from the University of Maryland Extension discusses high tunnels and season extension techniques that can be beneficial for grow tent setups. It offers insights into creating a controlled environment to extend the growing season, which is a principle that is central to the concept of grow tents.
  3. Hydroponic Growing System: Topics by Science.gov
    • Domain: science.gov (.gov)
    • Published Date: January 1, 1995
    • Description: This page aggregates various resources and topics related to hydroponic growing systems from different governmental scientific databases. It can be a valuable resource for understanding the scientific principles behind hydroponic systems, which are often used in conjunction with grow tents for optimal results.


from HydroponicHarmony https://hydroponicharmony.com/what-size-ventilation-fan-do-i-need/

How to build a simple DWC hydroponic system?

Introduction

Building a simple DWC (Deep Water Culture) hydroponic system is an excellent way to grow plants without the need for soil. With this system, plants are suspended in a nutrient-rich solution that oxygenates the roots. As someone who has experience in hydroponics, I can attest to the effectiveness and simplicity of this method.

Advantages of building a simple DWC hydroponic system

  1. Increased growth rate: With the roots submerged in a nutrient solution, plants have direct access to everything they need for optimal growth. This leads to faster germination, vegetative growth, and ultimately, bigger yields.
  2. Water conservation: Unlike traditional soil-based gardening, DWC hydroponics uses less water. The system recirculates the nutrient solution, minimizing water waste and making it an environmentally friendly option.
  3. Less maintenance: The simplicity of a DWC system means less time spent on maintenance tasks. Once set up properly, the system requires only periodic monitoring and adjustment of nutrient levels. This makes it a great choice for those with busy schedules.
  4. Year-round growing: DWC hydroponics allows for year-round growing, regardless of weather conditions. By controlling factors such as light, temperature, and nutrients, you can create an optimal environment for your plants to thrive.
  5. Space efficiency: DWC hydroponics is ideal for those with limited space. The system can be set up in small areas such as balconies, patios, or even indoors. This makes it accessible to urban gardeners or anyone who wants to maximize their growing potential.

In conclusion, building a simple DWC hydroponic system offers numerous advantages, from increased growth rates to water conservation and year-round growing capabilities. With a little effort and the right resources, you can enjoy the benefits of this efficient and sustainable gardening method.

DWC larg
Source: www.homehydrosystems.com

Materials and Tools Needed

List of materials needed for a simple DWC hydroponic system

To build a simple DWC hydroponic system, you will need the following materials:

  1. A container or reservoir: This will hold the nutrient solution and support the plants.
  2. Net pots or plant baskets: These are used to hold the plants in place while allowing the roots to reach the nutrient solution.
  3. Growing medium: Choose a medium like clay pellets, coco coir, or perlite that provides support for the plants’ roots.
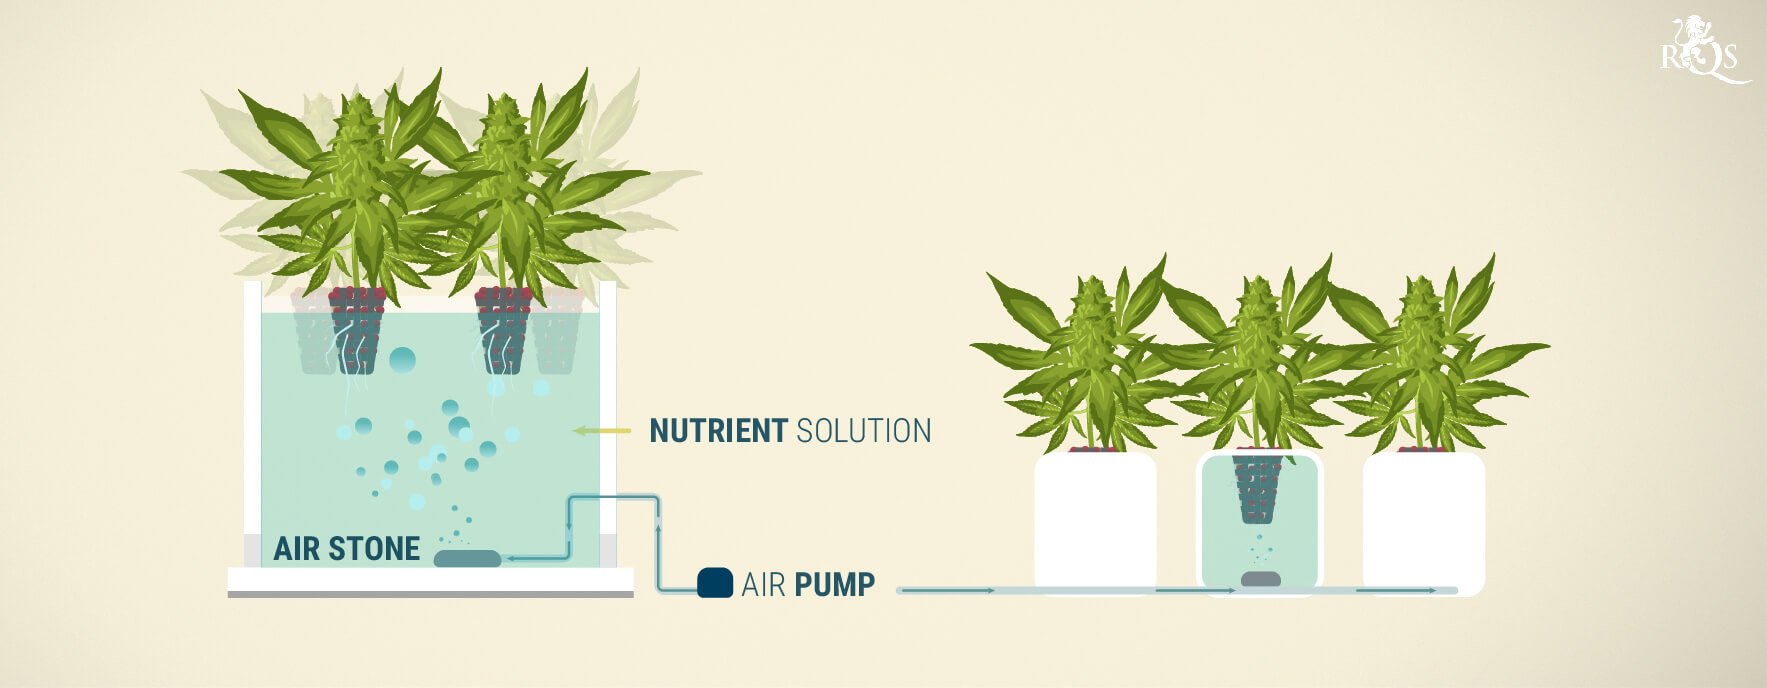
  4. Air pump and air stones: Oxygenation is crucial for the health of the plants. An air pump and air stones will help to oxygenate the nutrient solution.
  5. pH meter and pH adjustment solutions: Monitoring and adjusting the pH level of the nutrient solution is important for optimal plant growth.

Maintenance and care tips for a simple DWC system

To ensure the success of your DWC hydroponic system, consider the following maintenance tips:

  1. Regularly monitor the pH and nutrient levels of the solution to maintain optimal conditions for the plants.
  2. Inspect the air pump and air stones regularly to ensure proper oxygenation.
  3. Clean the reservoir and replace the nutrient solution every 1-2 weeks to prevent the build-up of algae and bacteria.
  4. Check the roots for any signs of disease or rot and remove any affected plants to prevent spread.

Conclusion highlighting the convenience and effectiveness of a simple DWC system

Building a simple DWC hydroponic system provides a convenient and effective way to grow plants without soil. With proper maintenance and care, this system can yield impressive results in terms of plant growth and productivity.

Tools required for building the system

The tools that will be helpful in building your simple DWC hydroponic system include:

  1. Drill and drill bits: You may need to drill holes in the container or reservoir for the net pots and air lines.
  2. Utility knife or scissors: These will come in handy for cutting holes in the lid of the container or trimming the plants’ roots.
  3. Measuring container: You will need a measuring container to prepare the nutrient solution accurately.
  4. Screwdriver: Depending on the design of your system, a screwdriver might be needed for assembly.

Remember to follow safety precautions when using these tools and refer to the specific instructions for your system.

How to build a simple DWC hydroponic system
Source: hydroponicway.com

Step-by-Step Guide: How to Build a Simple DWC Hydroponic System

Step 1: Setting up the reservoir

The first step in building a DWC (Deep Water Culture) hydroponic system is to set up the reservoir. Choose a container large enough to hold your nutrient solution. Make sure it is lightproof to prevent algae growth. Fill the reservoir with water and add the required amount of hydroponic nutrients according to the instructions.

Step 2: Installing the air pump and air stone

To provide oxygen to the plant roots, install an air pump and air stone in the reservoir. The air pump will push air through the air stone, creating oxygen bubbles in the nutrient solution. This oxygenates the roots and prevents them from suffocating.

Step 3: Adding the net pots and growing medium

Next, place net pots into the lid of the reservoir. Fill each net pot with a growing medium such as perlite or clay pellets. These materials provide support for the plants and allow for adequate air and water circulation around the roots.

Step 4: Transferring the plants to the system

Carefully remove the plants from their current containers and gently wash off the soil from the roots. Place each plant into a net pot, ensuring that the roots are completely covered by the growing medium.

Step 5: Adjusting nutrient levels and pH

Regularly monitor the nutrient levels in the reservoir and adjust them as necessary. Also, check the pH level of the nutrient solution using a pH testing kit. Adjust the pH using pH up or pH down solutions to maintain an optimal level for nutrient uptake.

Step 6: Maintaining the DWC hydroponic system

Maintain your DWC hydroponic system by regularly checking the water level in the reservoir and topping it up when needed. Monitor the plant’s growth and health, and make any necessary adjustments to the nutrient levels or pH. Clean and sanitize the system periodically to prevent the buildup of bacteria or algae.

By following these six steps, you can build a simple and effective DWC hydroponic system to grow plants without soil. Remember to regularly monitor and maintain the system to ensure healthy plant growth and maximize yield.

How to build a simple DWC hydroponic system
Source: www.royalqueenseeds.com

Benefits and Challenges of DWC Hydroponics

Benefits of using a DWC hydroponic system

As an avid hydroponics enthusiast, I have found that DWC (Deep Water Culture) is one of the simplest and most effective systems for growing plants. Here are some key benefits of using a DWC hydroponic system:

  1. Increased oxygenation: DWC systems provide a constant supply of highly oxygenated nutrient solution to the plant roots. This promotes faster and healthier growth compared to traditional soil cultivation.
  2. Efficient nutrient uptake: In a DWC system, the plant roots have direct access to nutrients dissolved in the water. This allows for optimal absorption and utilization, leading to robust plant growth and higher yields.
  3. Water and resource conservation: DWC hydroponics uses significantly less water compared to traditional soil-based farming. The recirculation of nutrient solution in the system minimizes water waste, making it an environmentally friendly choice.

Challenges and potential issues to watch out for in DWC hydroponics

While DWC hydroponics offers numerous benefits, it also comes with a few challenges. Here are some potential issues to be aware of when setting up a DWC system:

  1. Root rot: The high levels of moisture in DWC systems can create an environment conducive to the growth of harmful bacteria and fungi, leading to root rot. Regular monitoring and maintenance, including proper oxygenation and sterilization techniques, can help prevent this issue.
  2. System leaks: DWC systems rely on an airtight and watertight container. Any leaks can disrupt the oxygenation and nutrient delivery, negatively impacting plant health. Regular checks of the system’s seals and connections are essential to avoid leaks.
  3. Nutrient and pH management: Maintaining the proper nutrient and pH levels in the reservoir is crucial for plant health. Regular monitoring and adjustment of nutrient solutions are necessary to ensure optimal growth and prevent nutrient deficiencies or imbalances.

By understanding the benefits and challenges of DWC hydroponics, you can effectively set up and maintain a simple and efficient hydroponic system for cultivation.

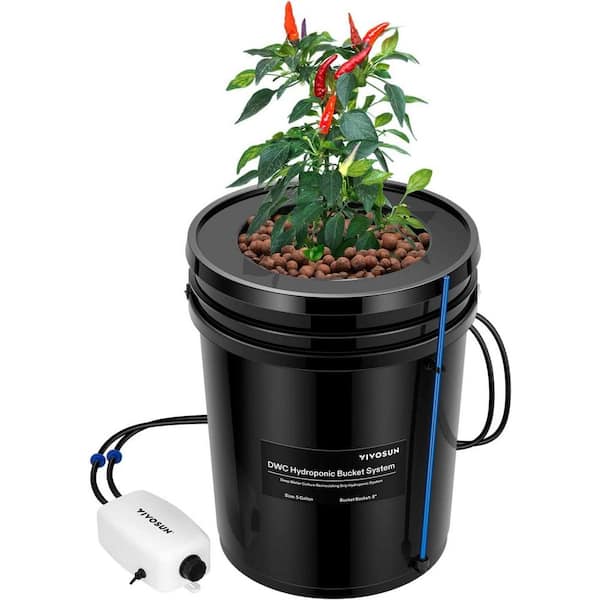
black vivosun hydroponic systems wal dwc 0001 64 600
Source: images.thdstatic.com

Tips for Successful DWC Hydroponics

Tips for optimal plant growth and productivity in DWC hydroponics

  1. Oxygenation: In a Deep Water Culture (DWC) system, oxygen is crucial for roots to thrive. Ensure that the air stones or diffusers in your reservoir are providing adequate oxygenation to prevent root rot and promote healthy growth.
  2. pH monitoring: Regularly check and adjust the pH levels of your nutrient solution. Most plants thrive in slightly acidic conditions, with a pH range of 5.5 to 6.5. Use a pH meter or testing kit to maintain the ideal pH balance for optimal nutrient absorption.
  3. Nutrient solution management: Maintain a consistent and well-balanced nutrient solution. Follow the manufacturer’s instructions for nutrient dosages and ensure that your plants are getting the appropriate levels of essential nutrients. Regularly monitor and adjust nutrient levels to avoid deficiencies or toxicities.
  4. Lighting: Provide the correct type and intensity of light for your plants. LED grow lights are often recommended for DWC hydroponics due to their energy efficiency and ability to provide the full light spectrum that plants require for photosynthesis. Position the lights at the appropriate distance from the plants to avoid burning or stretching.

Common mistakes to avoid when building and maintaining a DWC system

  1. Overcrowding plants: Give your plants enough space to grow and spread their roots in the water reservoir. Overcrowding can lead to competition for nutrients and hinder plant growth.
  2. Contamination: Maintain cleanliness in your DWC system to prevent the growth of harmful bacteria, algae, or pests. Regularly clean and sterilize the reservoir, air stones, and other components to minimize the risk of contamination.
  3. Temperature regulation: DWC systems are sensitive to temperature fluctuations. Maintain the water temperature between 65°F and 75°F for optimal plant growth. Use a water chiller or heater if necessary to maintain a consistent temperature.
  4. Water level management: Ensure that the water level in the reservoir is maintained at the appropriate depth. Too high or too low water levels can negatively impact oxygenation and nutrient uptake.

By following these tips and avoiding common mistakes, you can build and maintain a successful DWC hydroponic system that promotes healthy plant growth and maximizes productivity.

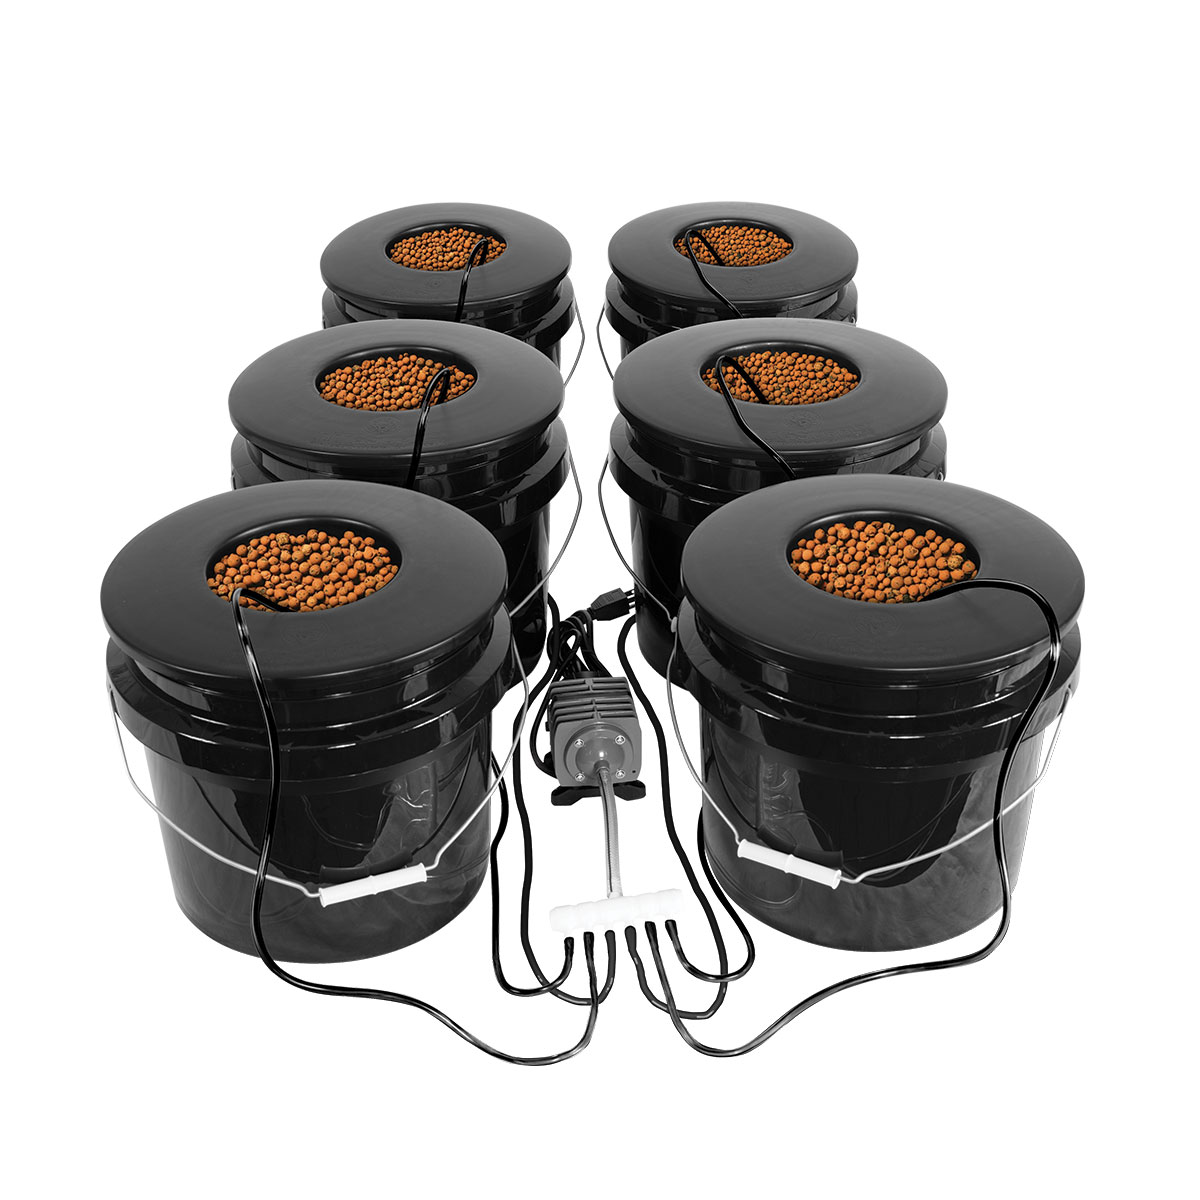
How to build a simple DWC hydroponic system
Source: www.htgsupply.com

Conclusion

Summary of the benefits and simplicity of building a DWC hydroponic system

Building a DIY DWC hydroponic system offers several benefits. It allows you to grow healthy plants with minimal effort, eliminates the need for soil, and enables you to control the nutrient levels for optimal growth. The simplicity of the system makes it accessible to both beginners and experienced gardeners alike. By following a few basic steps and gathering the necessary materials, you can set up your own DWC hydroponic system in no time.

Encouragement to try building your own system and start growing your own plants

If you’ve been considering diving into the world of hydroponics, building a DWC system is a great place to start. The simplicity and effectiveness of this system make it a popular choice among hobbyists and professional growers alike. By taking the time to research and gather the necessary materials, you can create a thriving hydroponic garden right in your own home. So, don’t hesitate to give it a try! Start growing your own plants and enjoy the benefits of hydroponic gardening.

  1. Hydroponics
    • Domain: nal.usda.gov (.gov)
    • Published Date: March 14, 2016
    • Description: This resource from the National Agricultural Library, a part of the USDA, provides a comprehensive overview of hydroponics, including deep water culture (DWC). It offers a range of resources and information to help individuals understand the principles and practices of hydroponic farming, including DWC hydroponics.
  2. Hydroponics
    • Domain: sustainability.ucsb.edu (.edu)
    • Published Date: January 1, 2023
    • Description: Hosted by the University of California, Santa Barbara, this page offers insights into hydroponics, including DWC hydroponics. It provides information on the sustainable practices involved in hydroponic farming, helping individuals learn how to set up and maintain a hydroponic system effectively.
  3. Small-scale hydroponics
    • Domain: extension.umn.edu (.edu)
    • Published Date: January 1, 2023
    • Description: This resource from the University of Minnesota Extension discusses small-scale hydroponics, including deep water culture systems. It offers guidance on how to start a small-scale hydroponic system, providing tips and information to help individuals successfully set up a DWC hydroponic system.


from HydroponicHarmony https://hydroponicharmony.com/how-to-build-a-simple-dwc-hydroponic-system/

15 Surprising Pros & Cons of Hydroponic Farming

Welcome to the world of hydroponic farming, where soil takes a backseat and plants thrive in innovative ways. Unlocking the secrets of pl...